How to Manage Composite Siding Joint Gaps: A Technical Guide
The thermal dynamics of residential building envelopes are often underestimated by those focused solely on the aesthetic finish of a property. In the realm of composite materials—which integrate wood fibers, cellular PVC, or various polymers—the primary challenge is not the material’s durability, but its physical movement. Unlike traditional wood, which primarily responds to moisture, composites are significantly influenced by temperature fluctuations. This characteristic makes the management of junctions and seams a critical technical requirement for any high-performance exterior.
A gap in a siding joint is rarely just an aesthetic flaw; it is a functional necessity designed to accommodate expansion and contraction. However, when these gaps are improperly sized, poorly placed, or misunderstood by installers, they become vectors for water infiltration, insect nesting, and perceived structural decline. To address these issues, one must move beyond simple installation manuals and look toward the engineering principles of material science and building physics.
Managing these intersections requires a balance between allowing for inevitable movement and maintaining a weather-tight, visually continuous facade. This analysis serves as a flagship reference for homeowners, architects, and contractors, providing the depth of knowledge required to ensure that the building’s “skin” remains resilient against the mechanical stresses of a changing climate.
Understanding “how to manage composite siding joint gaps”
The fundamental inquiry regarding how to manage composite siding joint gaps is actually a question of thermal management. Most composite materials possess a high coefficient of linear thermal expansion (CLTE). This means that a 12-foot board installed on a cool autumn morning may expand by a significant fraction of an inch by a summer afternoon. If boards are installed “butt-jointed” (tightly against one another), the expanding material will have nowhere to go, resulting in buckling, warping, or the shearing of fasteners.
Conversely, excessive gapping—often the result of installing in peak heat without adjusting for cooling—creates unsightly voids that expose the underlying weather-resistive barrier (WRB). The primary misunderstanding in the industry is that there is a “universal gap width.” In reality, the appropriate gap is a variable calculated based on the ambient temperature at the moment of installation relative to the regional temperature extremes.
Oversimplification often leads to a reliance on “caulking the gaps.” While high-quality sealants have their place, they are often used as a panacea for poor planning. If a gap is too narrow, the sealant will be squeezed out of the joint during expansion; if too wide, the sealant will tear during contraction. True management involves designing the joint to be either “breathable” or mechanically obscured.
The Systemic Evolution of Siding Expansion Technology
Historically, the construction industry relied on “lap” siding (overlapping boards) to hide the movement of wood. As the industry shifted toward composite materials in the late 20th century, the early formulations were plagued by extreme movement. Early PVC-based composites could expand so aggressively that they would pop off the wall if not gapped with nearly half an inch of clearance.
Modern engineering has introduced “low-expansion” cores and mineral-based composites that behave more like masonry than plastic. Furthermore, the development of hidden fastener systems—clips that allow the board to “float” behind the finish—has revolutionized how we perceive joint management. We have moved from a strategy of “fighting” the movement with nails to a strategy of “guiding” the movement with mechanical systems.
Conceptual Frameworks for Joint Dynamics
Effective management requires a shift in how we visualize the wall.
-
The “Piston” Model: Imagine each siding board as a piston in a cylinder. It must be allowed to move back and forth along its horizontal axis without hitting the “cylinder head” (the trim or the next board). This model emphasizes the need for clearance at both ends of a run.
-
The Seasonal Equilibrium Point: This framework asks the installer to identify the “neutral” temperature of the region. If the average temperature is $70^\circ\text{F}$, and you are installing at $40^\circ\text{F}$, the boards are at their smallest; you must gap them at their maximum width to account for the $30^\circ$ rise.
-
The Shadow-Line Integration: This is an aesthetic framework. Rather than trying to hide a gap with color-matched caulk (which will eventually fail or discolor), the design uses the gap as part of the architecture, ensuring that the WRB behind the gap is black to create a clean, intentional shadow line.
Categories of Joint Treatment and Material Trade-offs
The methodology chosen for gapping depends heavily on the specific material substrate.
| Joint Method | Best For | Trade-off | Maintenance Level |
| Butt-Joint with Back-Flashing | Fiber Cement / Mineral | Relies on the flashing for water management; gaps remain visible. | Low |
| Scarf Joints (Overlapping) | Wood-Plastic Composites | Harder to cut; can “open up” unevenly if not glued on one side. | Moderate |
| Expansion Trim / H-Molds | Cellular PVC | High aesthetic impact; creates a vertical “break” every 12-20 feet. | Low |
| Caulked Joints | Traditional Lap Siding | Requires high-grade elastomeric sealant; high risk of “shiner” (sealant smear). | High |
Realistic Decision Logic
When deciding how to manage composite siding joint gaps, the professional must choose between “concealment” and “accommodation.” In regions with extreme temperature swings (e.g., the American Midwest), accommodation via H-molds or deliberate shadow gaps is superior. In temperate coastal climates, concealment via high-performance sealants may be viable.
Detailed Real-World Scenarios How to Manage Composite Siding Joint Gaps
Scenario A: The Peak-Summer Installation
A crew installs 16-foot composite boards on a south-facing wall in $95^\circ\text{F}$ heat. They leave the manufacturer-recommended $1/8$-inch gap.
-
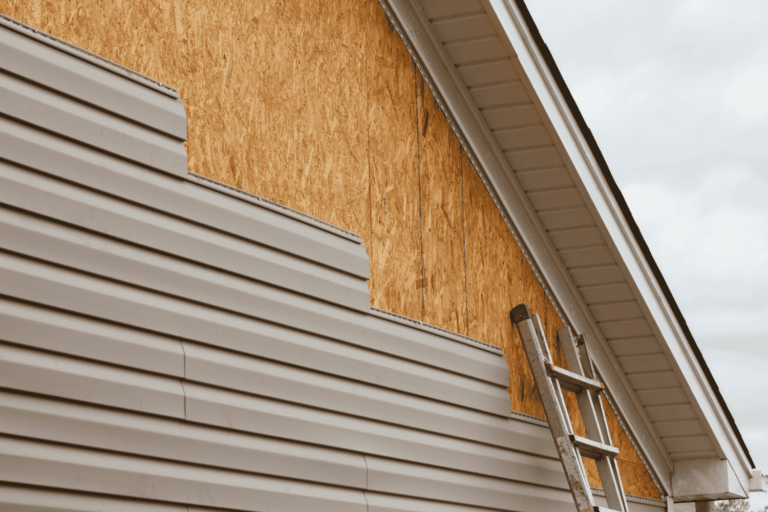
Failure Mode: When winter hits and temperatures drop to $20^\circ\text{F}$, the boards contract significantly. The $1/8$-inch gap opens to $3/8$-inch, exposing the flashing and creating a “stair-step” visual pattern across the house.
-
The Fix: In peak heat, boards should be installed with minimal or “tight” gaps, as they are already at their maximum expansion.
Scenario B: The Dark-Tone Trap
A homeowner selects a “Deep Charcoal” composite siding. Dark colors absorb more solar radiation, reaching surface temperatures far higher than the ambient air.
-
Constraint: The boards expand $40\text{–}50\%$ more than a white or cream-colored equivalent.
-
Decision Point: Standard gapping rules must be discarded in favor of “oversized” gapping or the use of specialized expansion joints every 10 linear feet to prevent the dark boards from buckling against the window casings.
Planning, Cost, and Resource Dynamics
The “cost” of managing gaps is rarely found in the materials, but in the precision of the labor.
| Cost Driver | Estimated Premium | Long-term Value |
| Back-Flashing (Pre-cut metal/PVC) | $0.50 – $1.50 per joint | Prevents rot of the wall sheathing; 30-year life. |
| High-Performance Elastomeric Sealant | $10 – $15 per tube | Stretches up to 500%; reduces “tear-out” failures. |
| Laser Alignment Labor | $500 – $1,200 (Total Project) | Ensures horizontal seams align perfectly, making gaps less noticeable. |
| Remediation of Buckled Boards | $2,000 – $5,000 | The cost of ignoring expansion; requires removal and re-installation. |
Tools and Strategies for Precision Management
-
Spacer Shims: Using consistent, plastic horseshoe shims during installation rather than “eyeballing” the gap ensures a uniform visual across the facade.
-
Back-Flashing (The “Drainage Plane”): Installing a 6-inch strip of color-matched metal or UV-stable plastic behind every butt joint. Even when the gap opens, water is directed away from the house.
-
Thermal Charting: Referencing the manufacturer’s “Expansion Table,” which dictates specific gap widths for specific installation temperatures.
-
Pinning vs. Floating: Fastening the center of a long board securely (“pinning”) while allowing the ends to slide (“floating”) ensures that expansion happens equally in both directions rather than pushing all the way to one end.
-
Color-Matched Backing: Painting the WRB or the flashing the same color as the siding so that when the joint opens, the “background” doesn’t draw the eye.
Risk Landscape: Compounding Structural Failures
Improper joint management is a “gateway” failure. A gap that is too tight causes a board to buckle. This buckle creates a “pocket” where the siding pulls away from the wall, allowing wind-driven rain to get behind the boards. Once water is trapped, the wood-fiber content in many composites can begin to swell from the back side—a condition known as “mushrooming.” At this point, the material is permanently damaged and cannot be “re-gapped.”
Maintenance and Long-Term Adaptation
Joints are the most dynamic part of the wall and require periodic “governance.”
-
The 5-Year Sealant Audit: If using caulked joints, inspect for adhesive failure (where the caulk pulls away from the board).
-
Gap Clearing: Ensure that debris, such as pine needles or spider webs, hasn’t packed into the expansion gaps, which can restrict movement and trap moisture.
-
Fastener Check: In “floating” systems, ensure that the siding hasn’t “walked” (shifted horizontally) to one side, closing the gap on the left while doubling it on the right.
Evaluation: Metrics for Joint Health
-
Linearity Tracking: A straight edge held across a joint should show no “crowning” or “dipping.” Any deviation indicates the boards are pressing against each other.
-
Gap Consistency: Use a feeler gauge to check if the gaps have changed significantly over a 12-month cycle.
-
Sealant Integrity: Caulk should remain concave or flush, never “bulging” out (a sign of over-compression).
Common Misconceptions and Oversimplifications
-
“Composites Don’t Move”: This is the most dangerous myth. While they don’t rot like wood, they move more than wood thermally.
-
“Caulk Fixes Everything”: Caulk is a bridge, not a structure. If the bridge is too short for the river’s movement, it will break.
-
“Tight Joints Look Better”: They look better for one week, until the first hot day makes the wall look like a washboard.
-
“The Gap is for Water”: The gap is for the material. The flashing is for the water. Confusing these two roles leads to moisture problems.
Conclusion: The Logic of Controlled Movement
The successful management of a composite exterior is an exercise in humility before the laws of physics. One cannot stop a polymer board from expanding when the sun hits it; one can only provide the infrastructure for that expansion to occur gracefully. Mastering how to manage composite siding joint gaps is the difference between a facade that degrades within a decade and one that maintains its structural and aesthetic integrity for a generation. The hallmark of a master editor or builder is the willingness to accept the gap as a functional partner in the design, rather than a flaw to be hidden.